A Patriotic T-shirt
I know that I say this all of the time, but this year is flying by! We are already closer to next Christmas than last and the Fourth of July is next week! I have vowed not to wait until the last minute for any of my holiday projects this year so I have already put together my Independence Day T-shirt for our family celebration with plenty of time to spare!

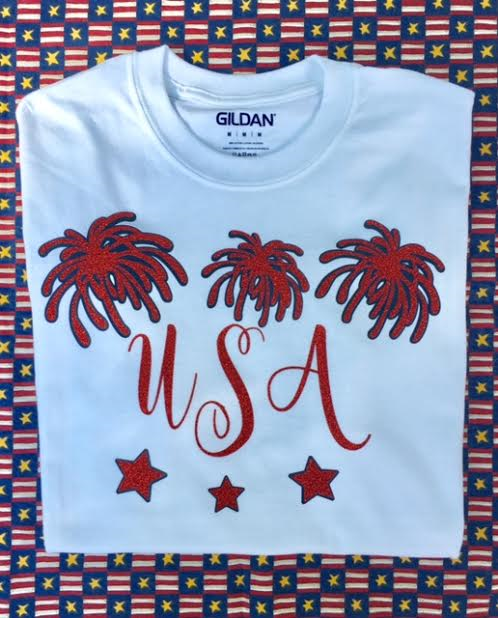
I purchased a plain t-shirt from Walmart when I was there purchasing plants last week. It was in the craft section for $2.00. Not bad. They are also inexpensive at Michael's. The next step was Cricut Design Space where I set up my design for my personalized Tee. I purchased this single image from Cricut, but I believe that it comes from the "Stand and Salute" cartridge. The stars were free and letters were from a free font that I downloaded from the internet. For some reason I can't them to upload into Design Space on my P.C., so I did my initial design there and changed the font on my iPad and cut from there.

The images were cut from Cricut's Iron-On Transfer paper, I used navy blue and red glitter.

The directions are excellent and there are several "how-to" videos online in case you get stuck, so I won't bore you with another tutorial on the topic. I do have some tips though:


If it isn't a card, you will get two entries into the drawing!
Hop on over Fantabulous Cricut Challenge to see some creative projects and, if you are feeling crafty yourself, post your patriotic Cricut project!

I haven't had a lot of time for crafting (or blogging) lately, but I got inspired to do some more Fourth of July projects while working on this one. Stay tuned to see if I actually get time to do them!
Thanks for stopping by today!
~Cynthia
I purchased a plain t-shirt from Walmart when I was there purchasing plants last week. It was in the craft section for $2.00. Not bad. They are also inexpensive at Michael's. The next step was Cricut Design Space where I set up my design for my personalized Tee. I purchased this single image from Cricut, but I believe that it comes from the "Stand and Salute" cartridge. The stars were free and letters were from a free font that I downloaded from the internet. For some reason I can't them to upload into Design Space on my P.C., so I did my initial design there and changed the font on my iPad and cut from there.

The images were cut from Cricut's Iron-On Transfer paper, I used navy blue and red glitter.

The directions are excellent and there are several "how-to" videos online in case you get stuck, so I won't bore you with another tutorial on the topic. I do have some tips though:
- Shop around for your transfer paper. It is not inexpensive. I noticed that Michael's has had sales on their Cricut products recently, but I missed the buy one, get one 50% off sale that they had a couple of weeks ago. I purchased these from Amazon and I still think I got a better deal. I have also noticed that there are other brands that claim to do the same thing and are Cricut compatible. I have not tried them yet.
- Be patient! This is NOT one of my virtues, but do make sure that you follow the directions and press the images on the shirt for the time directed. I learned this the hard way!
- Don't worry! If you use the glitter paper, it does not get all over the t-shirt like I originally thought. It stays on the transfer tape.
 |
| The "glitter" seen on the tape here does not transfer to the shirt. |

- Don't limit yourself to Cricut cuts only. You can also cut your own images by hand.
- Don't try to layer glitter on glitter. The glitter paper has to be the top layer, otherwise, it won't stick. This is a bummer for me! You know how I love my glitter! I used a plain paper for the bottom layer here.
 |
This isn't the first time I have made holiday t-shirts. You can see my Valentine's Day tee here and my St. Patrick's day shirt here. It's really fun to make special shirts for any occasion!
I finished this t-shirt just in time to join this week's Fantabulous Cricut Challenge:
Challenge #304-Patriotism
Make a project about patriotism in any country!
Make a project about patriotism in any country!
The winner will receive a $20 Gift Certificate!
To qualify for the prize, be sure to use at least 1 Cricut cut on your project and if it's not obvious, let us know what cartridge you used. If you use a Cricut Explore machine, at least one cut must be from the Cricut catalog of images.
If it isn't a card, you will get two entries into the drawing!
Hop on over Fantabulous Cricut Challenge to see some creative projects and, if you are feeling crafty yourself, post your patriotic Cricut project!

I haven't had a lot of time for crafting (or blogging) lately, but I got inspired to do some more Fourth of July projects while working on this one. Stay tuned to see if I actually get time to do them!
Thanks for stopping by today!
~Cynthia


WOZER!!!!!! I would wear this in a heartbeat how fun!! Have a blessed day
ReplyDeleteDIANA L.
DL.ART DESIGN TEAM MEMBER
DL.ART crinkle ribbon
http://dianamlarson.blogspot.com
http://dianamlarson.ctmh.com
Thank you, Diana! That is the best compliment you can give me!
DeleteCool t-shirt!
ReplyDeleteThis is adorable!! I love that shirt!!
ReplyDeleteThanks so much, Stacey!
DeleteThis is so amazing!! Love the layers and the way you laid it all out! Happy July 4th!!
ReplyDelete