An Easy and Inexpensive Easter Wreath!
I have to admit- I have a little bit of spring fever. After a miserable January, February is turning out to be warm and wonderful and I am really looking forward to Spring and Easter. Deciding that I would like to make a new wreath for my kitchen door, I decided to venture into the crafting world of wire mesh ribbon. I am a little late to this game- wire mesh ribbon wreaths have been popular for ages, but better late than never! The material is fairly inexpensive and can be used in a wide variety of ways. When I found this ribbon (officially called "Decorative Mesh") at the Dollar Store I thought that I would give it a try. If I failed it would not be a great monetary loss.

I think that it turned out pretty well! The photo doesn't really reflect the sparkle in the ribbon (if I made it- you know that there has to be some sparkle!) With the glitter on the eggs, but it turned out to be a pretty sparkly little breathe of spring! I think I invested about $12.00 in the whole thing!
If you would like to make one too:
You will need 6 rolls of wire mesh ribbon in the colors of your choice. (Don't just think about Easter. We have St. Patrick's Day and a variety of Patriotic holidays coming up soon as well.) Besides being "Easter-y" these pastel colors remind me of a baby shower.
You will also need about 4-5 rolls of regular ribbon, a wire wreath form and some pipe cleaners. You can also find all of that at the Dollar Store.

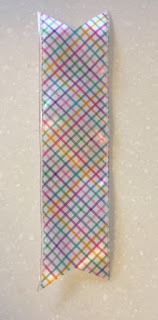
Cut the mesh ribbon in 8-9 inch lengths. You do not need to worry about precision measuring here. Cut the regular ribbon in 8.5- 9 inch lengths. Fold the cut ribbon in half length wise and make a little tail by cutting about an inch above the end on the folded side to the bottom corner of the un-folded side.
Your ribbon should look like this.
Your mesh ribbons should look like this:

The mesh ribbon is going to curl on itself. That is what we want it to do. Gather three mesh ribbon sections and a section of regular ribbon and bind together by twisting a pipe cleaner section around it. Attach the bundles to the wreath, beginning with the inside rung.

Once that ribbon bundles have completely covered the inside rung, fill in the gaps by placing bundles around the outside rung.

Add other decorations as desired. I happened to have these glitter eggs in my stash and added them to make the wreath a little more "Easter-y".

You can check out the craft section of your favorite store, the Easter section of the craft store or your own stash for decorations. I think if I had had another roll of wire mesh ribbon I would have made a bow to add to the top of the wreath. But, on the other hand, that may have been too much.
A confession: When I opened the mesh ribbon package I found different instructions that look a lot less labor intensive, yet still make a cute wreath. It also requires only four rolls of mesh ribbon and no regular ribbon (but uses mesh tubing instead) I may try those directions for my next attempt.
I am so excited for the special spring days ahead! Stay tuned for some fun St. Patrick's Day, Easter and Birthday treats and crafts in the weeks to come!
I hope that you are enjoying some crafting time and some beautiful spring weather too!
Thanks for stopping by today!
~Cynthia

I think that it turned out pretty well! The photo doesn't really reflect the sparkle in the ribbon (if I made it- you know that there has to be some sparkle!) With the glitter on the eggs, but it turned out to be a pretty sparkly little breathe of spring! I think I invested about $12.00 in the whole thing!
If you would like to make one too:
You will need 6 rolls of wire mesh ribbon in the colors of your choice. (Don't just think about Easter. We have St. Patrick's Day and a variety of Patriotic holidays coming up soon as well.) Besides being "Easter-y" these pastel colors remind me of a baby shower.
You will also need about 4-5 rolls of regular ribbon, a wire wreath form and some pipe cleaners. You can also find all of that at the Dollar Store.

Cut the mesh ribbon in 8-9 inch lengths. You do not need to worry about precision measuring here. Cut the regular ribbon in 8.5- 9 inch lengths. Fold the cut ribbon in half length wise and make a little tail by cutting about an inch above the end on the folded side to the bottom corner of the un-folded side.
Your ribbon should look like this.

Your mesh ribbons should look like this:

The mesh ribbon is going to curl on itself. That is what we want it to do. Gather three mesh ribbon sections and a section of regular ribbon and bind together by twisting a pipe cleaner section around it. Attach the bundles to the wreath, beginning with the inside rung.

Once that ribbon bundles have completely covered the inside rung, fill in the gaps by placing bundles around the outside rung.

Add other decorations as desired. I happened to have these glitter eggs in my stash and added them to make the wreath a little more "Easter-y".

You can check out the craft section of your favorite store, the Easter section of the craft store or your own stash for decorations. I think if I had had another roll of wire mesh ribbon I would have made a bow to add to the top of the wreath. But, on the other hand, that may have been too much.
A confession: When I opened the mesh ribbon package I found different instructions that look a lot less labor intensive, yet still make a cute wreath. It also requires only four rolls of mesh ribbon and no regular ribbon (but uses mesh tubing instead) I may try those directions for my next attempt.
I am so excited for the special spring days ahead! Stay tuned for some fun St. Patrick's Day, Easter and Birthday treats and crafts in the weeks to come!
I hope that you are enjoying some crafting time and some beautiful spring weather too!
Thanks for stopping by today!
~Cynthia


Comments
Post a Comment